Sunday, 24 April 2016

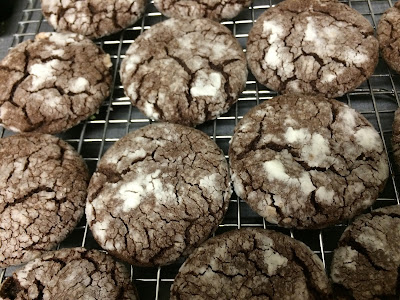
Fudge Crinkle Cookies

52 Weeks of Cookies:  Week 44


These ones are super simple to make and will only take you about 15 minutes (probably) from when you start making them to when they come out of the oven.  I found the recipe on Food.com but I think there are many MANY other versions of this... my mom made one called Zebra Cookies that was just like these.

I made these exactly as the recipe said to... but a word of warning... just read all her tips because I didn't and I'm wondering if using the last one where she says to "dry out" the cookies a little before putting the icing sugar on them would actually help to not have it get so absorbed into the cookie.  I knew this would happen from when I made my Chocolate Coffee Cookies so I rolled them all into balls and then rolled them in the icing sugar and then quickly gave them another run through the icing sugar just before popping them in the oven.... either I over oiled (which is possible because I estimated what about half the cake mix package would be) or I needed more wait time after I rolled them all into balls.  Ah well.. it doesn't affect the taste!

Speaking of taste... if you are looking for a cookie that tastes like a brownie then you'll enjoy these!  I'm giving them a 10/10 because they are easy to make and taste great (one day I'll figure out this icing sugar secret to make them look good too).


Last week I made some Peanut Butter Cookies that I was told were very good!


Saturday, 23 April 2016

Peanut Butter Cookies

52 Weeks of Cookies:  Week 43


We are down to our last few cookie recipes here folks!

I figured it was time I go back and try some old favourites for a bit (or at least this week).  So here is my second attempt at Peanut Butter Cookies... using an old recipe that I likely wrote down from somewhere online but I have no idea where.

If you missed it here was my first attempt at a peanut butter cookie recipe... I was drawn in by the lack of ingredients... when/if you make them be sure to have lots of milk on hand... you'll need it!

So I already knew these ones were good... here's the recipe

Ingredients:

1/2 cup butter
3/4 cup peanut butter
1/2 cup sugar
1/2 cup brown sugar
1 egg
2 tsp vanilla
1 1/2 cups flour
1/4 tsp salt
1/2 tsp baking soda
1/2 tsp baking powder


Directions:

Preheat oven to 350

Mix flour, salt, baking powder, and baking soda in a small bowl.

Beat butter, peanut butter, and sugars until light and fluffy.

Add eggs and vanilla to butter mixture and beat some more.

Add flour mixture to butter mixture and mix until smooth.

Bake for 10-12 minutes in preheated oven.


I brought these along with the Samoa Cookies I made last week to my Bible Study group.... no one complained!

Sunday, 17 April 2016

Samoa Cookies

52 Weeks of Cookies:  Week 42


I found this recipe on Just a Taste

Warning, these cookies will take a while to make.  Make them on a day you don't have much going on!

The alterations I made?  Not many... obviously I did not choose to go with the doughnut look for these cookies... I just figured using circles WITHOUT the middle cut out would be faster and easier... also, I don't have any circular cookie cutters so there's that (I just use a small cup to cut out the circles).

I didn't have any dark chocolate so I used semi sweet instead.

One word of warning that the recipe actually states as well.  Coconut will burn pretty quickly... we might all know this but also remember that the parchment paper that you put the coconut on will also burn if it touches the element in your oven.  Yes, I had a small kitchen fire while making these.  No the smoke detector didn't go off... it was pretty small and I got it put out right away.  What happened?  I was making toasting my coconut in the toaster oven instead of the oven so the pan is significantly smaller and I didn't bother to cut the parchment paper to fit it properly.  The first few minutes it was all fine.  I took the pan out of the toaster oven and mixed the coconut and then put the pan in the other way... which is when the parchment paper caught fire.  I quickly put just that area under the tap and leaned the pan that way so that the water wouldn't get all over the pan... and hardly any coconut was lost in the process.  After this happened I decided my coconut was toasted enough though.

A few notes... 

The bit of caramel you spread on your cookies before putting the caramel and coconut mixture on is important.  It holds the coconut onto the cookie.  I ran out of caramel for one cookie so left it off... and the coconut kept sliding off of the cookie.  So don't think you can get away with skipping that step!

The caramel coconut mixture will thicken up but won't harden up so that you can't manipulate it.  I found that spooning a bit on the cookies and leaving it for a few minutes and then going back and smoothing it out on the cookies worked much better than trying to smooth it around while it was still warm... it just stuck to everything then!

When I put the chocolate on the bottom of the cookies I placed them upside down on the tray (caramel coconut side down) and then put them in the fridge for a bit.  This hardened up the chocolate so that it wouldn't all come off on the pan.


The finished product!

By this point I was nearly out of chocolate and it was getting kind of late so I didn't care about what the tops looked like (but I'm not sure I would have cared much had it not been late either)

Samoa Cookies

I give these cookies a 9/10.  They are scrumptious but they take a loooong time to make.

Last week I made some Chocolate Chip Pretzel Cookies that were quite good

Monday, 11 April 2016

Chocolate Chip Pretzel Cookies

52 Weeks of Cookies:  Week 41


I've been thinking about putting pretzels in my cookies for a while now... so I did a quick Google search and came across these lovely little numbers from My Recipes.

I didn't change anything about the recipe but I failed to read the part where it said to bake it for 10 minutes if you want a soft cookie and 14 for a crisp cookie... so mine turned out to be the crisp kind which isn't terrible.... they are just a little hard to bite into (but they are not burnt so they still taste fine).

I also wasn't sure how coarsly to chop my pretzels (or what that really meant anyways) so I just dumped them into a ziplock bag and rolled a rolling pin over them for a bit.  There were small pieces there were large pieces I didn't much care.

Chocolate Chip Pretzel Cookies

I also failed to read the part where it said to let the cookies cool completely before eating... and I usually eat one nearly as soon as it comes out of the oven because that is usually when a cookie is in its prime.  Not these ones.  The oven does something to the pretzels that makes them weird when they are still warmed.  I was actually a little concerned that these would be another batch of no good cookies.. but don't worry... I had many more in the next couple of days which were much better.
I give these... 8/10.  They are pretty good but I think a regular chocolate chip cookie is probably still better.


Last week I made some Nutella Cookies that were super easy to make!

Saturday, 2 April 2016

Nutella Cookies

52 Weeks of Cookies:  Week 40


This isn't my first attempt at using Nutella in cookies.  You can find my first attempt at some Nutella White Chocolate Chip Cookies here.  But today we are on to bigger and better things (except I don't actually think these cookies were bigger... please notice how I'm not mentioning anything about whether they are better... foreshadowing?).  You can find the recipe that I used on Kirbies Cravings what really drew me into these was 2 things.

1) it said they only used 4 ingredients... and they were super easy to make because of this!
2) it was one of the first recipes that came up when I put "Nutella Cookie Recipe" into Google.

These ones won't disappoint folks.  I followed the recipe exactly... except it says it will make about 13 cookies and I halved the recipe and got 12... but I tend to make my cookies on the smaller side anyways (now you can eat 3 cookies and only feel the guilt of one!... or you know... not feel guilty about eating cookies... whichever).


I give these cookies a 10/10.  They were nice and chewy and tasty just like the title of the original recipe post said they would be.  Word of warning though... I tend not to read things once I've got the cookies in the oven and tried to remove them from the pan straight away... which ended up ruining one cookie into a pile of cookie pieces because it was so soft... it does say to let them cool on the pan... so just let them cool on the pan.  For those of you wondering... when I left them for like an hour and came back to them to put them away they came off perfectly.

Last week (which was really just a couple of days ago because I was so delayed with my post) I made some Oatmeal Chocolate Cranberry Cookies that were pretty good!

Friday, 1 April 2016

Spring Break!

Finally, a post that isn't about cookies!  

The sad news about this post is that I really haven't done a whole lot this spring break.  People were busy with other plans, sick, or took off for other places leaving me to clean, throw a spa night, and go for lots of long walks.

So, what does a girl write about when she didn't do much over the break?  She shares with what few readers she has how to have a pretty decent spa night at home!

You don't really need a reason to have a spa night in my opinion but I hosted mine for a very good reason... one of my good friends was turning 30 and this is what we could convince the most people to attend!

Step 1:
Dinner


Everyone but the birthday girl brought something for us to eat.
I made some sweet and sour chicken and veggies in the slow cooker so that I wouldn't be stressed about hosting and having to make diner right before everyone got here.  I also made some homemade garlic bread (which got rave reviews) and some rice.  Another guest provided us with salad and another with drinks.

I dimmed the lights to make it seem more like a restaurant because that was one of the things the birthday girl wanted to do.  

PS.  Those cups I got at Dollarama and served a few purposes.. for holding beverages (duh..), to be a little more fancy looking than regular cups, AND they were all different colours so if they moved around throughout the night you just had to remember what colour was yours.

A couple of other guests supplied us with some dessert.

Step 2:
Spa Services


One of the things the birthday girl wanted to do was to go to the spa... so I wanted to try to make my place as spa like as possible.  I dragged out my Christmas lights (even though they have the green wires I don't think they looked too bad) and some smaller lamps (the lamp on the shelf I ended up moving to the top so people could actually read the menu and services)

Step 3:
The set up


On that sign on the shelf I put where we would be doing each service.  My original thought was to have us doing something different in the different rooms of my condo but then I thought the point was also for us all to spend time together... so I did my best to keep us all in one room of my condo (the living/dining room).

The coffee table is where we did our nails (a guest also supplied us with probably about 100 nail polish colours to choose from).
Those 2 big bins by my couch were for foot soaks
And in front of the tv I put a long mirror for us to apply face masks


I also tried to think of things that you would eat/drink at a spa and I figured tea was likely something... so I set up a little tea station (I don't believe it got used though)... for someone that doesn't drink tea I think I have a decently large tea collection!


Step 4:
Have fun!

No pictures from the evening because I was too busy having fun.

I guess I can always spend some time with the rest of my spring break putting my place back to the way it usually is.

Hope we all had a great spring break!